Support Center
Get Screen Sharing for Tnet Mail or Gmail with Screenleap.

There are multiple screen-sharing programs out on the Internet to choose from. What makes Screenleap so attractive is its simplicity. It is incredibly easy to use and requires no downloading. Screenleap for Gmail allows you to access screen-sharing simply by clicking a button in your Tnet Mail or Gmail.
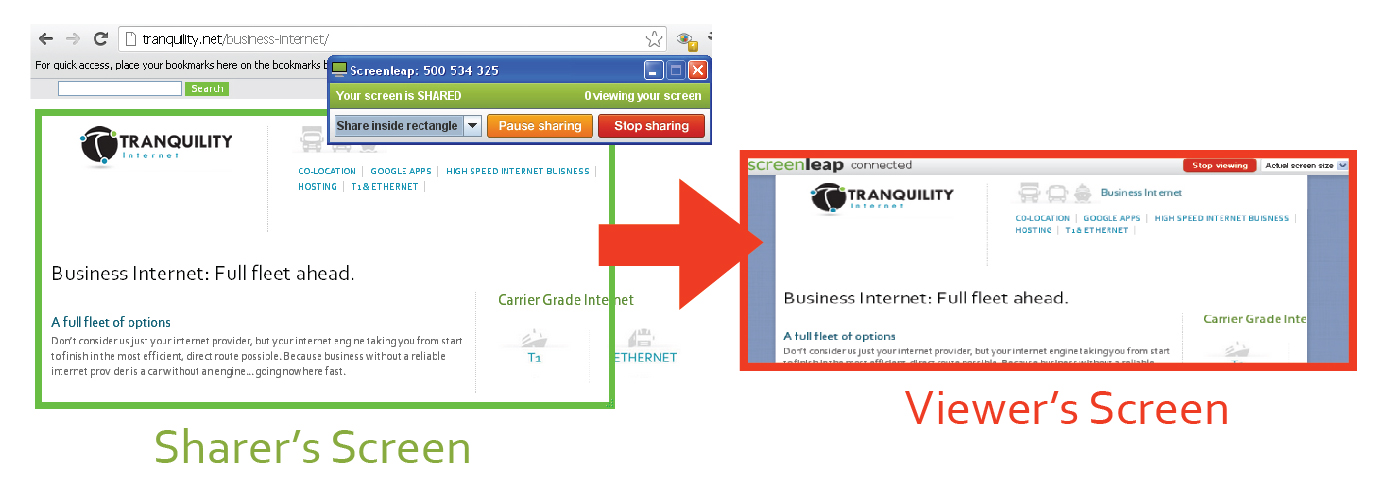
The installation process is easy. Following these steps will place buttons in your Tnet Mail or Gmail for hassle-free screen-sharing:
- Launch Chrome. Screenleap for Gmail will not work in any other browser.
- Log in to your Tnet Mail or Gmail account.
- Go to Screenleap for Gmail in the Google Chrome webstore and click Add to Chrome. Click Run if the Java Runtime permission window appears.
- Refresh your Tnet Mail or Gmail or open it in a new tab or window.
Once you have installed Screenleap for Gmail, there are four ways to share with your contacts. So sharing your screen is easily accessible regardless of what part of your Gmail or Tnet Mail you are using.
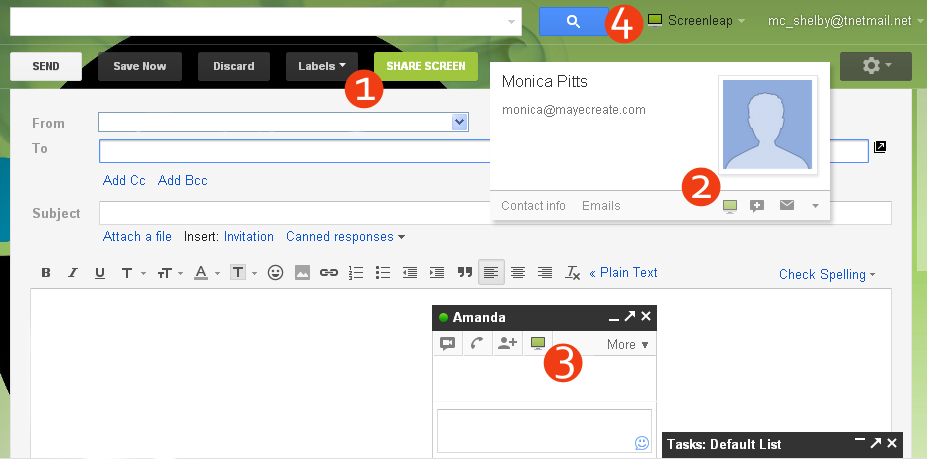
Method One: In email composition mode
Click Compose in the upper, left corner of your Tnetmail or Gmail. When you begin drafting your email, you will see a green Share Screen button above the From field. When you click it, a linked URL will be entered into the text of your email draft. The recipient of the email can click this URL and see your screen as you share it.
Method Two: From a contact hovercard
Click Mail on the left side of the screen to release a drop-down menu. In the menu, choose Contacts. Hover your mouse over the contact with whom you would like to share your screen. In the hovercard that appears, locate the green computer screen. Click on it to share your screen. If the contact is online, a linked URL will be sent to him or her through chat. Otherwise, an email will be created with a linked URL.
Method Three: In chat
Open chat. At the top of the chat screen will be a green computer icon. Click it, and a linked URL will be entered into a chat message to the respective recipient.
Method Four: Using the button in the top right corner
In the top right of the screen is a drop-down menu labeled Screenleap. Click to expand the menu. Then, click the button that says Share your screen to share. Screenleap will generate a link that you can copy and send to the screen viewer.
Let Your Tnet Mail or Gmail Do the Thinking for You with Boomerang or Right Inbox.
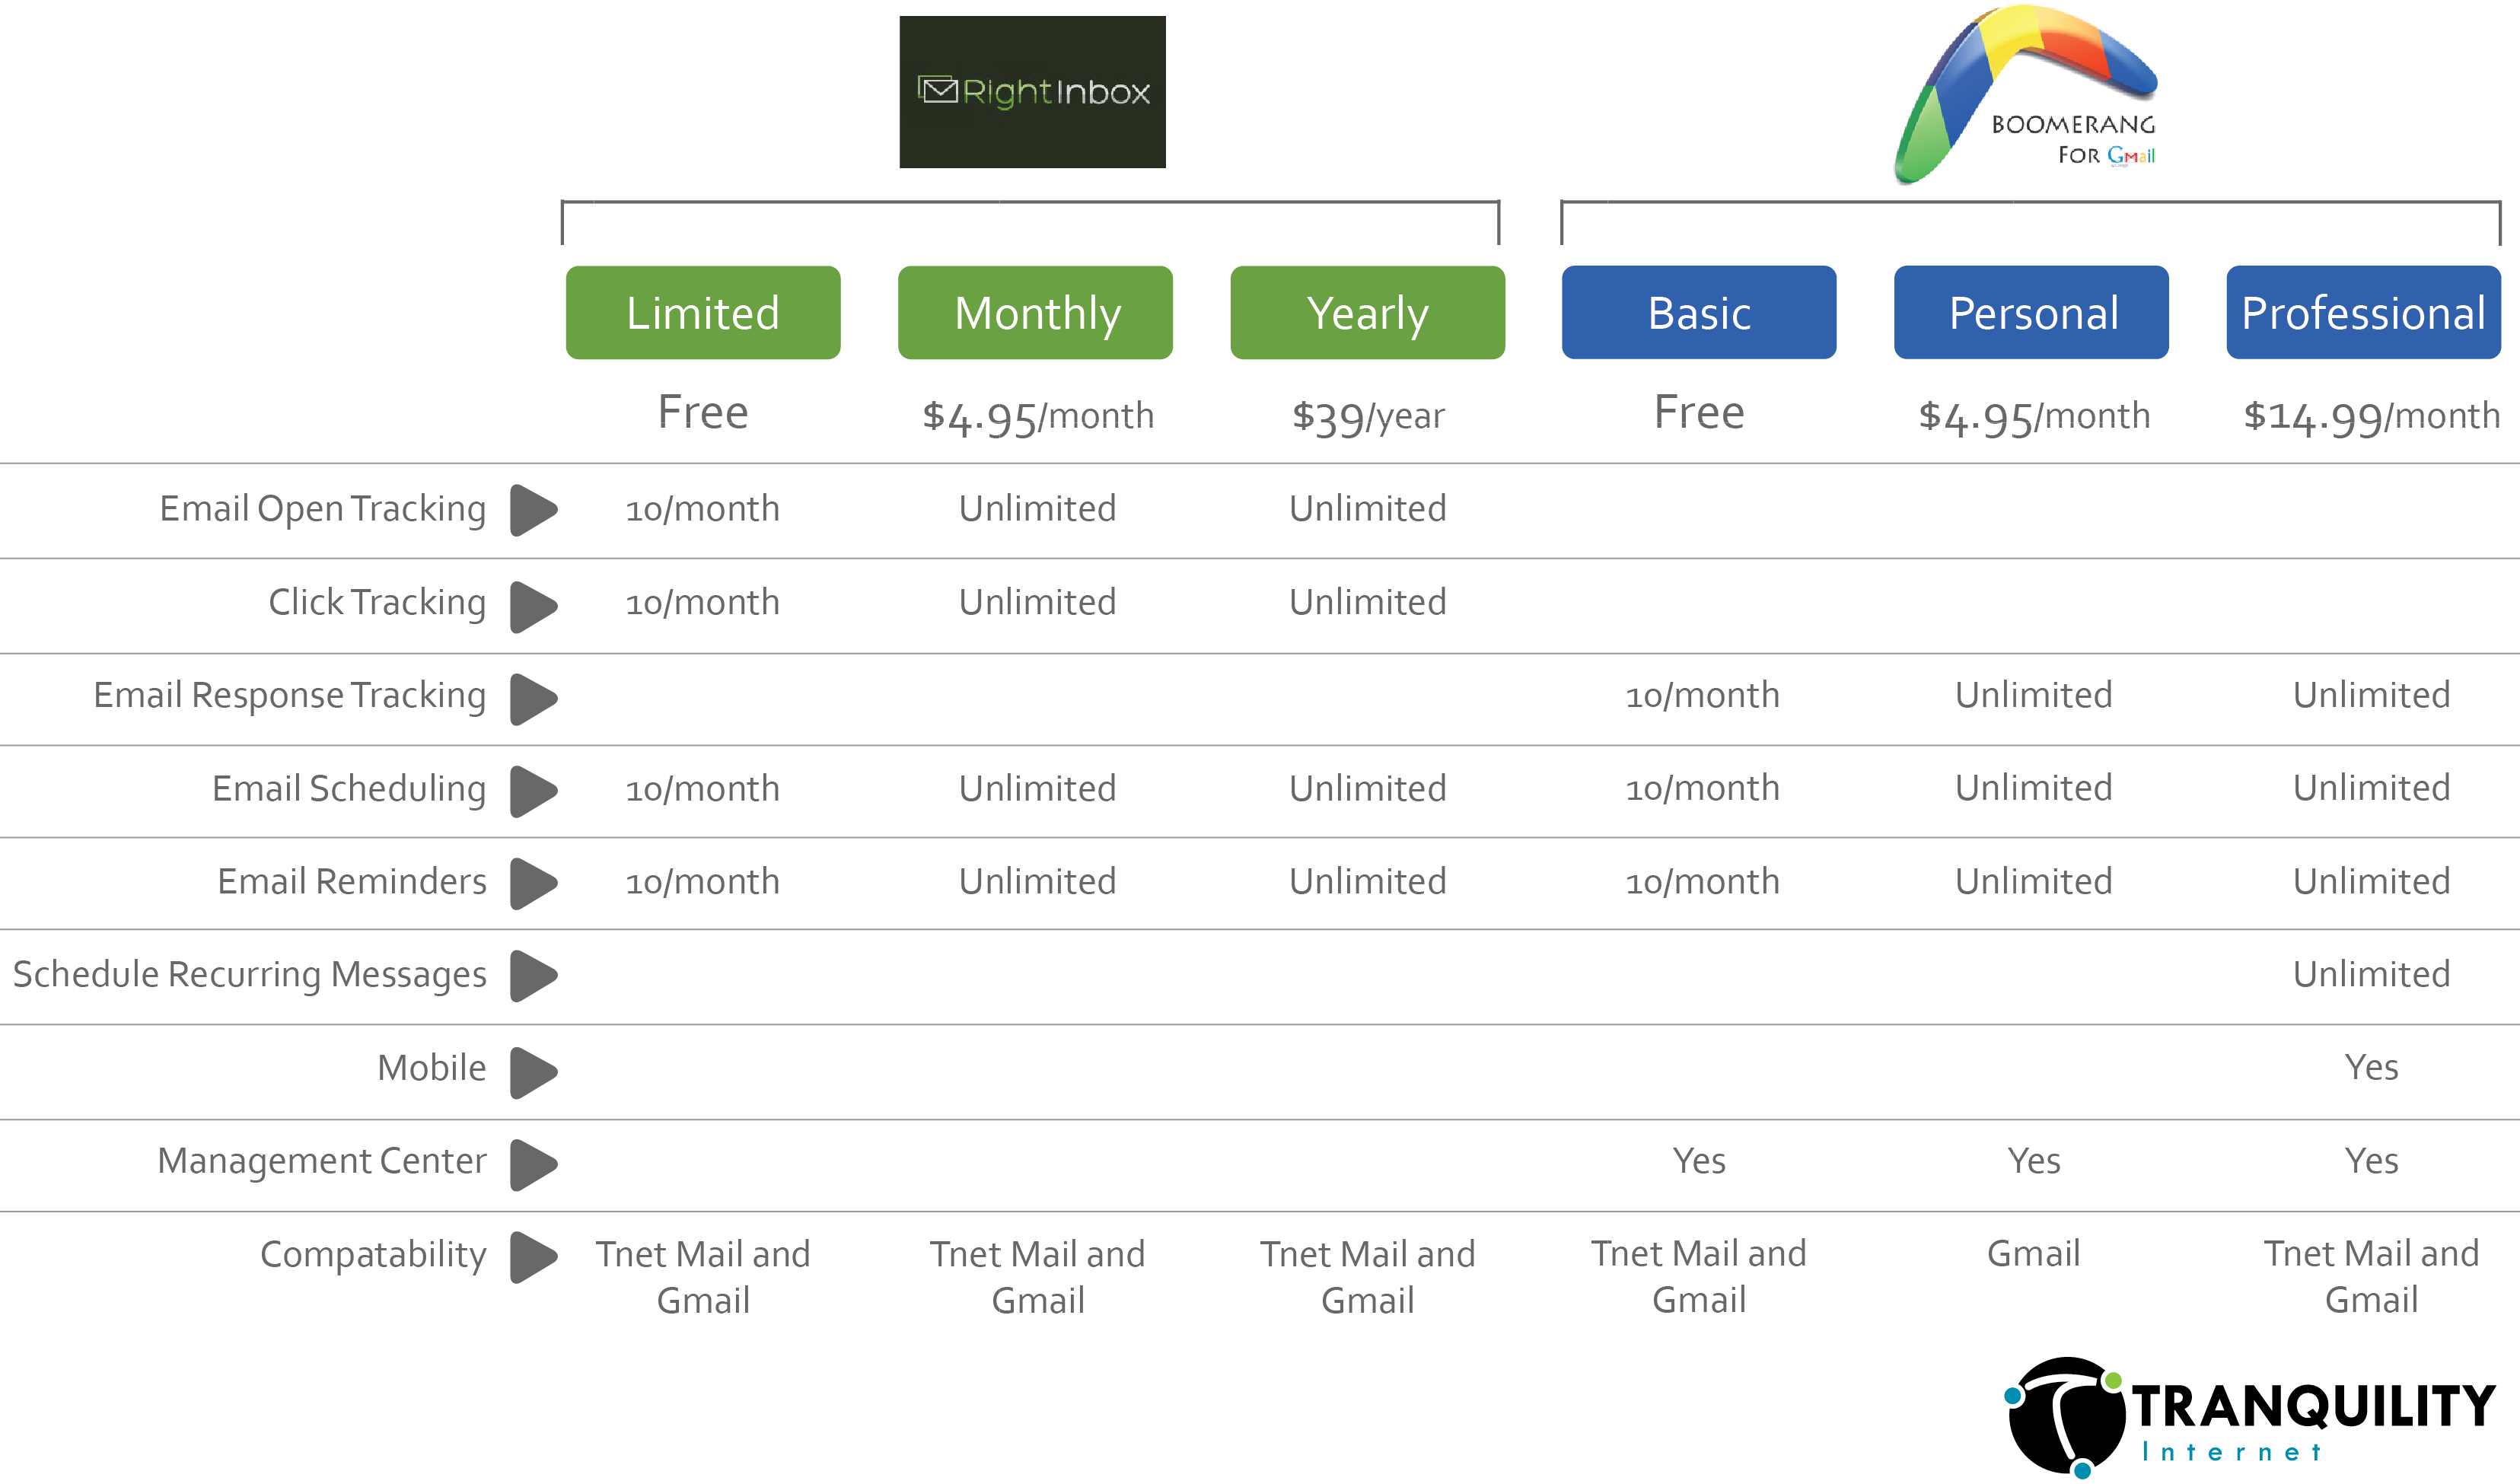
It’s a Monday morning, you’re tired…and you just want your email to do the thinking for you. Two online programs, Right Inbox and Boomerang for Gmail, can help you with your Monday morning woes. These programs allow users to schedule emails in the future, track sent emails and set reminders.
Each program offers a trial package with 10 free emails each month. Right Inbox and Boomerang can extend the functionality of your Gmail or Tnet Mail account beyond what Gmail already provides:
Compare Google Documents with the New Google Drive.

In April, Google launched Google Drive as a replacement for Google Documents, but not everyone has converted yet. The new program has been compared to Dropbox, which allows you to store and share your documents online and edit them offline.
If you’re still using Google Documents with your Tnet Mail account, you should consider switching over to Google Drive. It does have it’s shortcomings in comparison to Dropbox, but offers an improvement over Google Documents. View the comparison of features between Google Drive and Google Documents below, to decide which one is right for you:
Create an Email Alias in Tnet Mail.
Email can get messy. But Tnet Mail clients can use aliases to keep their webmail accounts organized and centralize all incoming and outgoing mail. An email alias is a virtual address that redirects to your preexisting email account.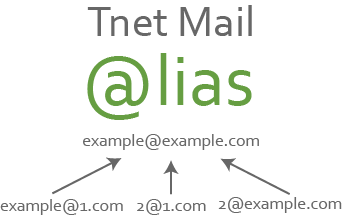
An alias example
For example, if Jane Doe got married to John Newlywed and wanted to change her old address, janedoe@tnetmail.net, to something including her new surname, she wouldn’t have to create a new account. She could simply set up an email alias, called janenewlywed@tnetmail.net, for her old account.
In the workplace, email aliases can be used:
- to create individual return addresses for an email account accessed by multiple employees
- combine home and work email accounts
- communicate with different contacts using different reply addresses
Each Tnet Mail user can set up 30 different email aliases. Before you go diving into your Tnet Mail account, though, look over the steps below. Setting up an alias requires the work of both your Tnet Mail administrator and you, the user.
The administrator must:
- Sign in to the Google Apps control panel by going to https://www.google.com/a/cpanel/primary-domain-name and tacking on your domain name to the end. Enter your sign-in information for the admin account.
- Locate the account you would like to add an alias to by entering the username in the search box at the top of the control panel and clicking Search accounts.
- Select the row for the user account to display the user information page and click Add a nickname.
- Enter the new alias name (what comes before the @ symbol) in the Add a nickname text box and select a domain from the drop-down list (what comes after the @ symbol) for the alias. Click Save changes. Within 24 hours, the alias should be ready to use.
Then, the user should:
- Go to Settings by clicking on the wheel button in the top-right corner of your inbox.
- In the menu across the top of the page, click Accounts.
- In the section titled Send message as, click the Add another email address you own link.
- A box will pop up, prompting you to enter the Email address you would like to use as an alias. Enter the alias and click Next Step.
- Continue to click Next Step on the following prompts, choosing your settings as you go, until you reach the option to verify the new alias. Click Send Verification.
- An email will be sent to your inbox with a link and confirmation code. Click on the link and enter the confirmation code in the setup window.
If you followed the steps correctly, you should be ready to start sending and receiving mail with your new alias! You will still use the primary address to log in, receive calendar invitations, sync with your mobile device and share Google Docs and Sites, but can communicate with coworkers and clients using your alias.
To learn more about Tnet Mail and the support it can offer your business, visit our webmail page or contact Tranquility today.
Get Technologically Fit this Summer.
By now, most people have forgotten their New Years resolutions. Summer offers an opportunity to break from your old routine, though. If you have a summer resolution to become more tech savvy, then Tranquility has the scoop on how to help you achieve your goal before the fall season comes around. Here’s a list of technology workshops offered in Columbia during the summer season:
MayeCreate Design’s Lunch and Learn Workshops
 Tranquility’s sister company, MayeCreate, does website and print design for clients locally and throughout the Midwest. This summer, MayeCreate is offering its annual Lunch and Learn series of hands-on workshops geared to expand attendees’ digital horizons. Lunch from the Bread Basket Cafe is also served during the workshops. Classes take place the second Wednesday of the month at the MayeCreate office, 307 Locust downtown Columbia. The remaining workshops for this summer are Under the Hood of Google Analytics and Flash Back to WordPress.
Cost per class: $20-25
View the Schedule and Register >
Don’t Lose Valuable Online Content: Convert Web Pages to PDFs.
Ever clicked on a bookmark just to be disappointed by a deleted web page? Websites get deleted every day. To save valuable information you’ve discovered online, create a PDF and save it locally. Then, you can access it without a web connection.
Creating a PDF is easier than copy and pasting content into a Word document, and unlike screen capturing, a pdf allows you to save more than just what appears on your computer screen. You can select text within the document and view higher quality photos.
Try one of the browser tools or the online converter below to begin creating PDFs of valuable online content:
Chrome’s Built-in Feature
Creating PDFs is a built-in feature of the web browser Chrome, so if you already use Chrome it is very easy to do…two steps kind of easy to do.
- Click on the wrench icon in the upper right corner of your browser or right click your mouse anywhere on the web page. In the menu that appears, click Print.
- A window will pop up in your browser. Under Destination, choose Save as PDF. Select your settings and click Save.

Firefox’s Print Pages to PDF Add-On
Compared to other web browsers, Firefox is famous for its vast number of add-ons. You cannot create PDFs without installing an add-on in Firefox, but Print pages to PDF more than compensates for that feature.
This highly customizable add-on can be downloaded Here. Click on the Add to Firefox button, click Install Now in the pop-up window and restart Firefox.
After the add-on is installed, go to Tools in your menu bar, hover over Print pages to PDF and select Preferences. From there, you can determine the coloring, layout and other settings of your PDF. The chart below shows the size equivalencies of the Paper format option under Sizes and Margins.

Go to the Print Pages to PDF Homepage to learn more about creating PDFs in Firefox.
Web2PDF, a Free Online Converter
 Web2PDF is a free online file converter that lets you submit a URL and – by the click of a button – create a PDF. Web2PDF is unique, because it offers its users the ability to change many settings. After you enter your URL into the site, click on the options button to determine the size and setup of your PDF. Click Close then Convert to PDF.
Windows 2000 Setup
1. Go to your start menu and open the Network and Dial-up Connections Window.
Windows Live Mail Tnet Mail
1. Open Windows Live Mail and click on Tools and then Accounts
Thunderbird Tnet Mail
1. Open Thunderbird and click on Tools and then Accounts Settings.
Outlook Express Tnet Mail
1. Open Outlook Express and click on Tools and then Accounts
2. Click on the Mail tab, select your Tranquility account and then click Properties
3. Click on the General tab and fill in the necessary information.

More answers are
just a click away.
Browse the latest support articles at left, or if your question isn't covered in these topics, search our support center.
Ask The Tech Guy (39)
Dialup Setup (6)
Email Fraud Alerts (2)
Email Plus (2)
Email Setup (17)
Fiber (4)
How To (26)
Internet Dictionary (29)
T1/DS3 (3)
Tips (32)
Tnet Mail (17)
Web Hosting (3)
Website Resources (26)

We're a new kind of old school. We do house calls.
And business calls. If you'd rather save yourself some time and energy, we can come set up and fix stuff for you. Visit our remote support page for pricing information.
573-443-3983 |